在众多的App中,我们经常能用到各式各样的表格数据,实现方式有很多种,但是最常用的就是使用UITableView来实现了。用好UITableView,也是学好iOS的一门必修课。
目录
- 表格视图的功能和介绍
- 表格视图的基本使用
- 显示分组数据
- 单元格的构成和基本定制
- 常用事件处理
- 添加头部视图和尾部视图
- 设置段头和段尾
- 表格视图的编辑(难点)
- 表格视图的索引
- 表格的分割线
- 表格视图的搜索
- 表格视图控制器
表格视图的功能和介绍
表格视图的功能:

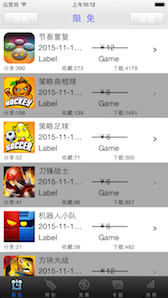
如上图所示,tableView可以显示多行多组数据
表格视图的介绍:
创建表格视图有两种风格,一种为Plain,另一种为Grouped.
UITableView有两个Delegate分别为:dataSource和delegate。实现表格视图的功能需要遵守两个协议,分别是UITableViewDataSource和UITableViewDelegate.
UITableView声明了一个NSIndexPath的类别,主要用来标识当前cell的在tableView中的位置,该类别有section和row两个属性,前者标识当前cell处于第几个section中,后者代表在该section中的第几行。
两个必须实现的协议方法:返回每组的行数,返回每行的数据
表格视图的基本使用
表格视图的创建:
代码
_tableView = [[UITableView alloc] initWithFrame:self.view.bounds style:UITableViewStylePlain];
_tableView.delegate = self;
_tableView.dataSource = self;
[self.view addSubview:_tableView];
显示一组数据
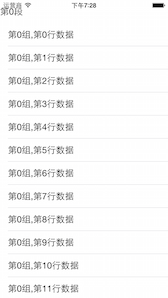
-(NSInteger)numberOfSectionsInTableView:(UITableView *)tableView
{
    return 1;
}
代码说明:
协议方法,返回组数
单元格的复用机制
static NSString *cellID = @"cell";
UITableViewCell *cell = [tableView dequeueReusableCellWithIdentifier:cellID];
if(cell == nil)
{
    cell = [[UITableViewCell alloc] initWithStyle:UITableViewCellStyleSubtitle reuseIdentifier:cellID];
}
代码说明:
定义cell的Identifier,用tableView的dequeueReusableCellWithIdentifier方法进行复用
显示分组数据
分组数据显示

- (NSInteger)numberOfSectionsInTableView:(UITableView *)tableView {
    return  _dataArray.count;
}

- (NSInteger)tableView:(UITableView *)tableView numberOfRowsInSection:(NSInteger)section {
    BOOL state = [_stateArray[section] boolValue];
    if (state) {
    return [_dataArray[section]count];
    }else {
        return 0;
    }
}
代码说明:通过传入的indexPath.section值,来显示每个分组的数据
单元格的构成和基本定制
单元格中的自带控件
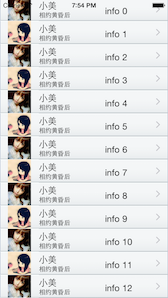
cell.textLabel.text = @"小美";
NSString *file = [NSString stringWithFormat:@"head%d.jpg",indexPath.row%2+1];
cell.imageView.image = [UIImage imageNamed:file];
cell.detailTextLabel.text = @"相约黄昏后";
代码说明:
UITableViewCell自带的控件有三个:textLabel,imageVie,detailTextLabel.其位置排列如图所示.
单元格行的高度
代码
-(CGFloat)tableView:(UITableView *)tableView heightForRowAtIndexPath:(NSIndexPath *)indexPath
{
    return 44.0f;
}
代码说明:cell默认高度为44.是iOS界面设计中最小最适宜的面积的触控面积,若要修改,可根据此协议方法进行修改
单元格的背景
代码:
UIImageView *backView = [[UIImageView alloc] initWithFrame:CGRectMake(0, 0, 320, 44)];
backView.image = [[UIImage imageNamed:@"table_cell_bg.png"] stretchableImageWithLeftCapWidth:8 topCapHeight:0];
cell.backgroundView = backView;
单元格的内容视图contentView
代码:
UILabel *label = [[UILabel alloc] initWithFrame:CGRectMake(200, 10, 100, 30)];
label.tag = 100;
//给label设置值放在外面
[cell.contentView addSubview:label];
代码说明:
cell自己添加控件,都加在contentView上,由于cell复用,这句代码不能写在if语句外面.
常用事件处理
某行被选中
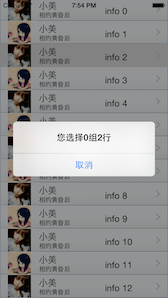
代码:
-(void)tableView:(UITableView *)tableView didSelectRowAtIndexPath:(NSIndexPath *)indexPath
{
    UIAlertView *alertView = [[UIAlertView alloc] init];
    alertView.message = [NSString stringWithFormat:@"您点击了%d组%d行",indexPath.section,indexPath.row];
    [alertView addButtonWithTitle:@"取消"];
    [alertView show];
}
某行被反选
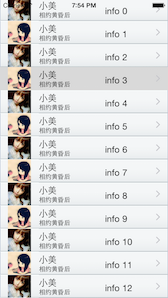
代码
- (void)tableView:(UITableView *)tableView didDeselectRowAtIndexPath:(NSIndexPath *)indexPath {
    UIAlertView *alertView = [[UIAlertView alloc] init];
    alertView.message = [NSString stringWithFormat:@"您取消选择%ld组%ld行",indexPath.section,indexPath.row];
    [alertView addButtonWithTitle:@"取消"];
    [alertView show];
}
添加头部视图和尾部视图
头部视图
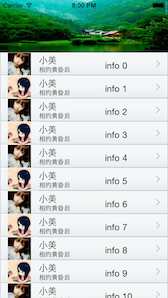
代码
UIImageView *headView = [[UIImageView alloc] initWithFrame:CGRectMake(0, 0, 320, 100)];
headView.image = [UIImage imageNamed:@"fenjing.jpg"];
_tableView.tableHeaderView = headView;
代码说明:利用tableView的tableHeaderView属性来设置
尾部视图
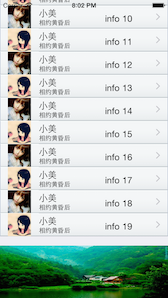
代码
UIImageView *footView = [[UIImageView alloc] initWithFrame:CGRectMake(0, 0, 320, 100)];
footView.image = [UIImage imageNamed:@"fenjing.jpg"];
_tableView.tableFooterView = footView;
代码说明:利用tableView的tableFooterView属性来设置
设置段头和段尾
设置文本段头
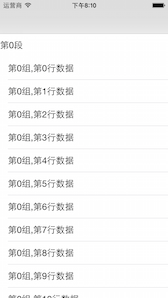
- (NSString *)tableView:(UITableView *)tableView titleForHeaderInSection:(NSInteger)section {
    return [NSString stringWithFormat:@"第%ld段",section];
}
设置自定义段头

-(UIView *)tableView:(UITableView *)tableView viewForHeaderInSection:(NSInteger)section
{
    UILabel *label = [[UILabel alloc] initWithFrame:CGRectMake(0, 0, 100, 44)];
    label.text  = [NSString stringWithFormat:@"第%ld段",section];
    return label;
}
设置段头高度
- (CGFloat)tableView:(UITableView *)tableView heightForHeaderInSection:(NSInteger)section {
    return 60;
}
设置段尾
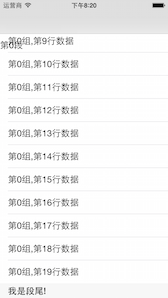
<h3 style=”background-color:#A3BB50; color:white; padding-top: 2px; padding-left: 5px;- (NSString *)tableView:(UITableView *)tableView titleForFooterInSection:(NSInteger)section { return @"我是段尾!"; }
padding-bottom: 2px;”; >表格视图的编辑(难点)单元格的删除操作[重点, 必须掌握]
代码:
- (void)tableView:(UITableView *)tableView commitEditingStyle:(UITableViewCellEditingStyle)editingStyle forRowAtIndexPath:(NSIndexPath *)indexPath
{
    //重要参数:
    //editingStyle 传入编辑风格(None,Delete,Insert)
    //forRowAtIndexPath: 传入删除或者插入的位置
    if(editingStyle == UITableViewCellEditingStyleDelete)
    {
        //处理删除操作
        NSMutableArray *subArray = _dataArray[indexPath.section];
        [subArray removeObjectAtIndex:indexPath.row];
    }
    //注意: 以后任何对于表格视图中数据的改变, 都应该调用这个方法,让表格视图重新加载新的数据
    [_tableView reloadData];
}
单元格的增加操作
代码:
- (void)tableView:(UITableView *)tableView commitEditingStyle:(UITableViewCellEditingStyle)editingStyle forRowAtIndexPath:(NSIndexPath *)indexPath
{
    //重要参数:
    //editingStyle 传入编辑风格(None,Delete,Insert)
    //forRowAtIndexPath: 传入删除或者插入的位置
    if(editingStyle == UITableViewCellEditingStyleInsert)
    {
        NSString *info = @"三里屯认识的阿娟";

        //插入位置 indexPath
        NSMutableArray *subArray = _dataArray[indexPath.section];
        [subArray insertObject:info atIndex:indexPath.row];
    }

    //注意: 以后任何对于表格视图中数据的改变, 都应该调用这个方法,让表格视图重新加载新的数据
    [_tableView reloadData];
}
单元格的移动操作
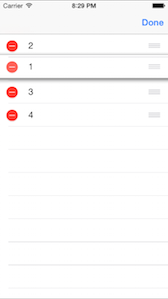
代码:
- (void)tableView:(UITableView *)tableView moveRowAtIndexPath:(NSIndexPath *)sourceIndexPath toIndexPath:(NSIndexPath *)destinationIndexPath
{
    //单元格移动之后数据并没有自动移动, 需要手动移动
    //分两步: 1.源数组中移除数据
    NSMutableArray *sourceArray = _dataArray[sourceIndexPath.section];
    NSString *info = sourceArray[sourceIndexPath.row];
    [sourceArray removeObject:info];

    //2. 目标数组中添加数据
    NSMutableArray *destinationArray = _dataArray[destinationIndexPath.section];
    [destinationArray insertObject:info atIndex:destinationIndexPath.row];

    [_tableView reloadData];
}
多行选中和多行删除操作
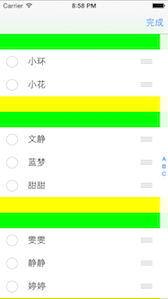
- (NSIndexPath *)indexPath
{
    NSString *info = _dataArray[indexPath.section][indexPath.row];
    [_multiSelectArray addObject:info];

    //以后多选有严格要求的话: 最好记录 indexPath
}

//当取消选择一个单元格时执行
-(void)tableView:(UITableView *)tableView didDeselectRowAtIndexPath:(NSIndexPath *)indexPath
{
    NSString *info = _dataArray[indexPath.section][indexPath.row];
    [_multiSelectArray removeObject:info];
}
表格视图的索引

//返回的是组的标签的索引(电话号码本边上的一列快速查询字母)
- (NSArray *)sectionIndexTitlesForTableView:(UITableView *)tableView {
    NSMutableArray *array = [NSMutableArray array];
    for (int i=0; i<26; i++) {
        [array addObject:[NSString stringWithFormat:@"%c",i+'A']];
    }
    return array;
}
表格的分割线

//分割线的设置
_tableView.separatorColor = [UIColor blackColor];
_tableView.separatorStyle = UITableViewCellSeparatorStyleNone;
表格视图的搜索

//创建搜索条
_searchBar = [[UISearchBar alloc] initWithFrame:CGRectMake(0, 0, 320, 44)];
_searchBar.placeholder = @"请输入您想要找的号码";
_tableView.tableHeaderView = _searchBar;

//有两种处理搜索的方式:
//  1.使用系统类处理搜索
//  2.新建一个界面处理搜索
//系统UISearchDisplayController中包含一个tableView
//      可以用这tableView显示搜索后的数据
_searchDisplayController = [[UISearchDisplayController alloc] initWithSearchBar:_searchBar contentsController:self];
//要给_searchDisplayController提供搜索结果
_searchDisplayController.searchResultsDataSource = self;
//注意: 当搜索框中文本改变时执行搜索

//viewDidLoad中
_searchResultsArray = [[NSMutableArray alloc] init];
表格视图控制器
说明:UITableViewController是系统提供的一个便利类,主要是为了方便我们使用UITableView,该类生成的时候就将自身设置成了其包含的tableView的dataSource和delegate,并创建了很多代理函数的框架,为我们大大的节省了时间,我们可以通过其tableView属性获取该controller内部维护的tableView对象。默认情况下使用UITableViewController创建的tableView是充满全屏的,如果需要用到tableView是不充满全屏的话,我们应该使用UIViewController自己创建和维护tableView。
UITableViewController提供一个初始化函数initWithStyle:,根据需要我们可以创建Plain或者Grouped类型的tableView,当我们使用其从UIViewController继承来的init初始化函数的时候,默认将会我们创建一个Plain类型的tableView。
UITableViewController默认的会在viewWillAppear的时候,清空所有选中cell,我们可以通过设置self.clearsSelectionOnViewWillAppear = NO,来禁用该功能,并在viewDidAppear中调用UIScrollView的flashScrollIndicators方法让滚动条闪动一次,从而提示用户该控件是可以滑动的。